Jev ကို ဘာကြောင့် အခုလူစိတ်ဝင်စားလာတာလဲ
AI agent ဆိုတာ စကားပြောတတ်တဲ့ chatbot တစ်ခုတည်း မဟုတ်ပါဘူး။ ကိုယ့်အစား အလုပ်တစ်ခုကို အဆင့်ဆင့်လုပ်ပေးတဲ့ software လို့ အရင်မြင်ကြည့်ပါ။ User ရဲ့အကြောင်းအရာကိုဖတ်မယ်၊ ဘာလုပ်ရမလဲရွေးမယ်၊ လိုတဲ့ tool ကိုခေါ်မယ်၊ ထွက်လာတဲ့ရလဒ်ကိုကြည့်ပြီး နောက်တစ်ဆင့် ဆက်သွားမယ်။
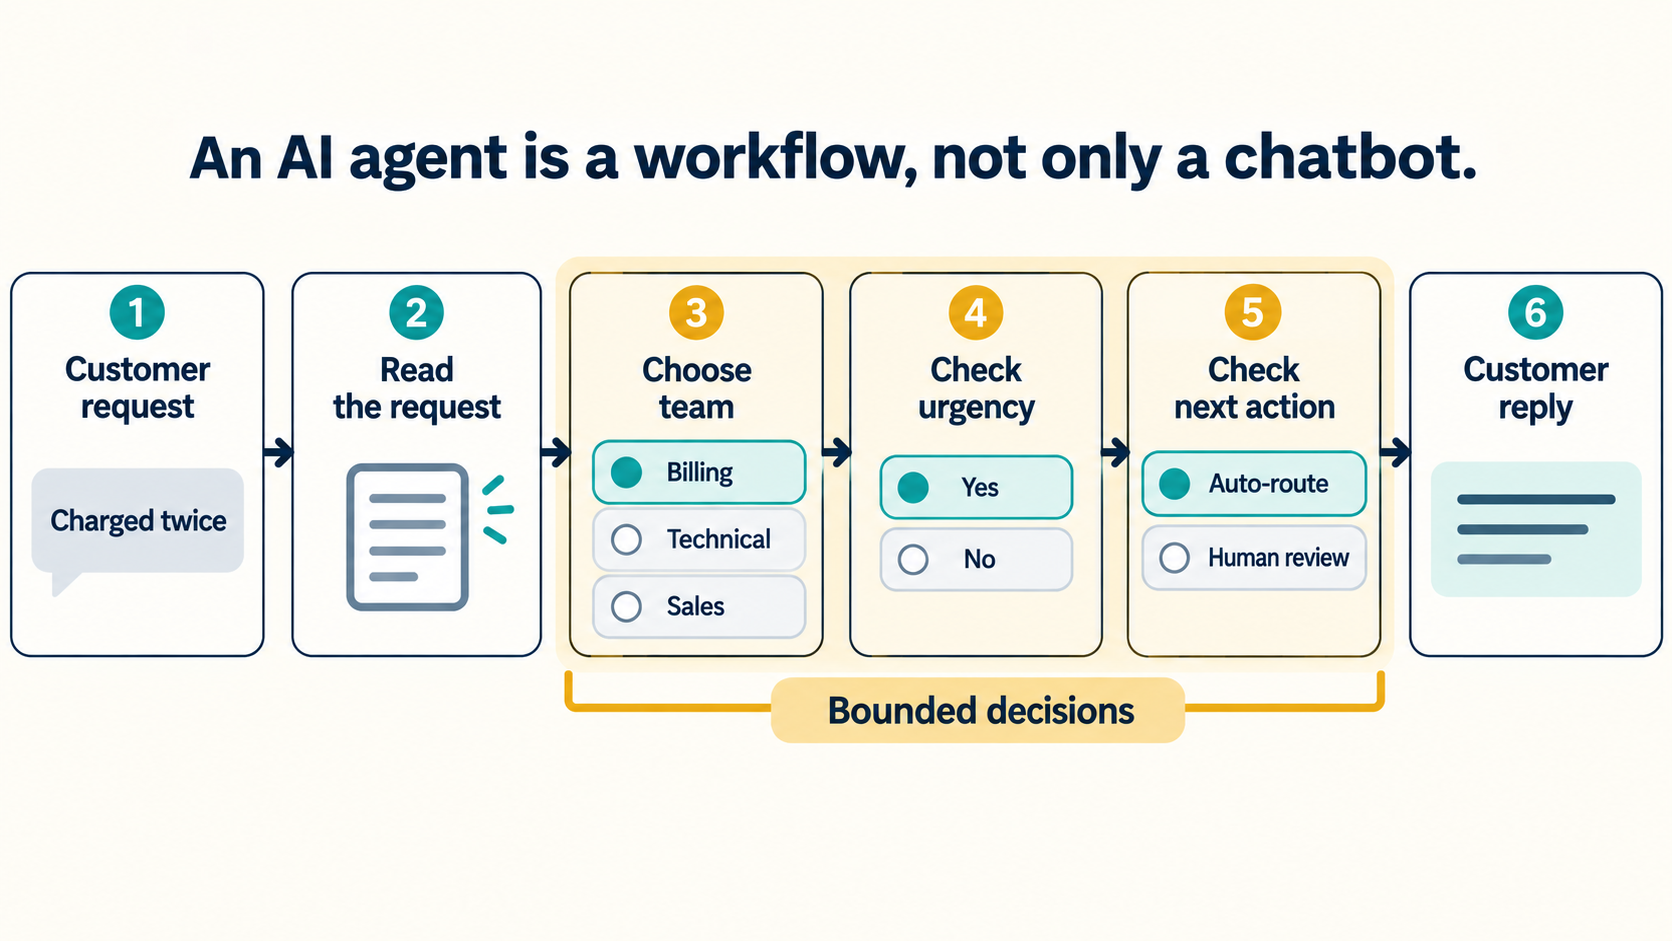
ဥပမာ customer-support agent တစ်ခုကို ကြည့်ရအောင်။ Customer က “ငွေနှစ်ခါဖြတ်ထားတယ်” လို့ ticket ပို့လာတယ်။ Agent က အဲဒီစာကိုဖတ်ပြီး Billing team ဆီပို့ရမယ်။ အရေးကြီးသလား စစ်ရမယ်။ Refund စည်းမျဉ်းနဲ့ကိုက်သလား ကြည့်ရမယ်။ ပြီးမှ customer ကို စာပြန်ရမယ်။
ဒီအလုပ်မှာ စာပြန်ရေးတာတစ်ခုပဲ ရှိတာမဟုတ်ပါဘူး။ အဆင့်တိုင်းမှာ “ဘယ် team ဆီပို့မလဲ”, “အရေးကြီးသလား”, “လူက စစ်ပေးဖို့လိုသလား” ဆိုတဲ့ ရွေးချယ်မှုသေးသေးလေးတွေ ရှိနေပါတယ်။ Agent ကောင်းကောင်းအလုပ်လုပ်နိုင်ဖို့ ဒီရွေးချယ်မှုတွေ မှန်ဖို့လိုပါတယ်။ ဒီလို data ကိုကြည့်ပြီး နောက်တစ်ဆင့်ကို ရွေးပေးတဲ့အပိုင်းကို decision intelligence လို့ ခေါ်ပါတယ်။
အဲဒီရွေးချယ်မှုအများစုမှာ အဖြေက အကန့်အသတ်ရှိပါတယ်။ Team က Billing / Technical / Sales ထဲကတစ်ခု၊ urgency က Yes / No၊ နောက်တစ်ဆင့်က Auto-route / Human review ထဲကတစ်ခု ဖြစ်နိုင်ပါတယ်။ စာရှည်ရှည်ရေးစရာမလိုဘဲ ကြိုသတ်မှတ်ထားတဲ့အဖြေထဲက ရွေးရတာပါ။ ဒီလိုရွေးချယ်မှုကို bounded decision လို့ခေါ်ပါတယ်။ အလွယ်ပြောရရင် “အဖြေဘောင်ရှိပြီးသား ဆုံးဖြတ်ချက်” ပါ။
ဒီအလုပ်ကို LLM နဲ့လည်း လုပ်လို့ရပါတယ်။ LLM ဆိုတာ ChatGPT, Claude, Gemini လို စာကိုဖတ်ပြီး စာပြန်ရေးပေးနိုင်တဲ့ model မျိုးပါ။ Support ticket ကိုပေးပြီး {"team":"billing"} လို့ ပြန်ခိုင်းနိုင်ပါတယ်။
ဒါပေမယ့် agent တစ်ခုက ဆုံးဖြတ်ချက်တိုင်းအတွက် LLM ကိုခေါ်ရင် အပိုဝန်တွေ တဖြည်းဖြည်းများလာပါတယ်။ LLM က အဖြေတိုတိုပဲလိုရင်တောင် စာကို token တစ်လုံးချင်းစီ ထုတ်ရပါတယ်။ Token ဆိုတာ model က စာကိုကိုင်တွယ်တဲ့ အစိတ်အပိုင်းငယ်ပါ။ Token ပိုသုံးလေလေ ကုန်ကျစရိတ်ပိုလာပြီး အဖြေစောင့်ချိန်လည်း ရှည်လာနိုင်ပါတယ်။
နောက်ထပ်ပြဿနာက ပုံစံမမှန်တာပါ။ Software က JSON လို တိကျတဲ့ပုံစံကို မျှော်နေချိန်မှာ LLM က ရှင်းပြစာထပ်ရေးပေးတာ၊ field name မှားတာ ဖြစ်နိုင်ပါတယ်။ အဲဒီအခါ စစ်ဆေးရတယ်၊ ပြင်ရတယ်၊ တစ်ခါတလေ model ကို ပြန်ခေါ်ရတယ်။ Request တစ်ခုအတွင်း ဆုံးဖြတ်ချက်အများကြီးရှိလာရင် အချိန်၊ ကုန်ကျစရိတ်နဲ့ စနစ်ထိန်းသိမ်းရတဲ့ဝန် ပိုသိသာလာပါတယ်။
ဒါကြောင့် LLM ကို ဖယ်ပစ်ဖို့မဟုတ်ဘဲ အလုပ်ခွဲပေးဖို့ လိုလာပါတယ်။ Customer ကို နားလည်လွယ်အောင် စာပြန်ရေးတာနဲ့ ခက်ခဲတဲ့အကြောင်းအရာတွေ ဆက်စပ်စဉ်းစားတာကို LLM ဆီပေးမယ်။ Team ရွေးတာ၊ အရေးကြီးမှုတိုင်းတာ၊ permission စစ်တာလို အဖြေဘောင်ရှိပြီးသားအလုပ်ကိုတော့ သီးခြား decision layer ဆီပေးမယ်။ Decision layer ဆိုတာ agent ရဲ့လမ်းကြောင်းအလယ်မှာ “နောက်တစ်ဆင့် ဘာလုပ်မလဲ” ကို ရွေးပေးတဲ့အလွှာပါ။
Jev ကို လူစိတ်ဝင်စားလာတာ ဒီနေရာမှာပါ။ Jev က စာပြန်ရေးပေးမယ့် chatbot မဟုတ်ပါဘူး။ လက်ရှိအခြေအနေကိုကြည့်ပြီး developer သတ်မှတ်ထားတဲ့မေးခွန်းတွေကို ဖြေကာ software က တိုက်ရိုက်သုံးနိုင်တဲ့ ဆုံးဖြတ်ချက် ပြန်ပေးဖို့ ရည်ရွယ်ထားတဲ့ model ပါ။ Support example မှာဆိုရင် customer ကို စာမရေးပေးဘဲ Billing, Urgent, Human review ဆိုတဲ့ ရွေးချယ်မှုတွေကို ထုတ်ပေးတဲ့အလုပ်နဲ့ ပိုနီးပါတယ်။
TypeSafe AI က September 15, 2026 မှာ Jev ကို early access နဲ့ မိတ်ဆက်ပြီး ပထမဆုံး public “System One Model” လို့ ခေါ်ထားပါတယ်။ ဒီအမည်ကို AI လောကတစ်ခုလုံးက စံအဖြစ်လက်ခံထားတာတော့ မဟုတ်သေးပါဘူး။ ဒါပေမယ့် agent တွေမှာ ထပ်ခါထပ်ခါဖြစ်နေတဲ့ အဖြေဘောင်ရှိသောဆုံးဖြတ်ချက်တွေကို သီးခြားကိုင်တွယ်မယ့် idea က လက်တွေ့စမ်းသပ်ကြည့်သင့်တဲ့အချက် ဖြစ်ပါတယ်။
ဘယ်သူတွေ ဖန်တီးခဲ့တာလဲ
Jev ကို TypeSafe AI က တည်ဆောက်ထားပါတယ်။ Company team page အရ founders သုံးဦးက Diogo Almeida (CEO), Sasha Sheng (COO), Erik Gafni (CTO) တို့ပါ။ Team page မှာ Almeida ကို RLHF နဲ့ InstructGPT ကို ပူးတွဲတီထွင်ခဲ့သူလို့ ဖော်ပြထားပါတယ်။ InstructGPT paper ရဲ့ author list ထဲမှာလည်း သူ့နာမည်ပါပါတယ်။
ဒီအကြောင်းကို ဘာကြောင့်ထည့်ပြောတာလဲ။ InstructGPT နဲ့ RLHF က model ကို လူခိုင်းတာနားလည်ပြီး ပိုအသုံးဝင်တဲ့စာ ပြန်ရေးတတ်အောင် တိုးတက်စေခဲ့တဲ့အလုပ်တွေပါ။ Jev မှာတော့ ရည်ရွယ်ချက်က မတူပါဘူး။ စာကောင်းကောင်းရေးပေးဖို့ထက် software အတွက် ရွေးချယ်မှုကောင်းကောင်းပေးဖို့ အာရုံစိုက်ထားပါတယ်။
System One ဆိုတဲ့အမည်က Daniel Kahneman ရဲ့ မြန်မြန်နဲ့ အလိုလိုဆုံးဖြတ်တဲ့ “System 1” အယူအဆကနေ ယူထားတာပါ။ Jev ကတော့ စီးပွားရေးပညာရှင် William Stanley Jevons ကို ရည်ညွှန်းပါတယ်။ TypeSafe ရဲ့အမြင်က AI နဲ့ဆုံးဖြတ်ချက်တစ်ခုချရတဲ့ကုန်ကျစရိတ် နည်းလာရင် software ထဲက ရွေးချယ်မှုသေးသေးလေးတွေကိုပါ အလိုအလျောက်လုပ်နိုင်မယ်ဆိုတာပါ။ ဒါက model နာမည်နောက်က အယူအဆဖြစ်ပြီး production မှာကောင်းမကောင်းကို အတည်ပြုတဲ့သက်သေတော့ မဟုတ်ပါဘူး။
Jev က ဘယ်လို AI အမျိုးအစားလဲ
Jev ကို decision model လို့ခေါ်ရင် အရှင်းဆုံးပါ။ Decision model ဆိုတာ စာရှည်ရှည်ထုတ်ပေးတာထက် ကြိုသတ်မှတ်ထားတဲ့ရွေးချယ်မှုထဲက အဖြေတစ်ခုကို ဆုံးဖြတ်ပေးတဲ့ AI ပါ။
Jev ဆီကို အချက်နှစ်မျိုးပို့ပါတယ်။ ပထမတစ်ခုက လက်ရှိအခြေအနေဖြစ်တဲ့ state ပါ။ Support example မှာ customer ရဲ့စာ၊ account အခြေအနေ၊ အရင် ticket history တို့ ဖြစ်နိုင်ပါတယ်။ ဒုတိယတစ်ခုက developer မေးချင်တဲ့ questions ပါ။ ဥပမာ “ဘယ် team ဆီပို့မလဲ” နဲ့ “လူကစစ်ဖို့လိုသလား” ဆိုတဲ့မေးခွန်းတွေပါ။
အဖြေအဖြစ် Jev က typed value နဲ့ probability ပြန်ပေးပါတယ်။ Typed value ဆိုတာ software က မျှော်ထားတဲ့အမျိုးအစားနဲ့ကိုက်တဲ့အဖြေပါ။ ဥပမာ team အတွက် Billing၊ true/false မေးခွန်းအတွက် true ဖြစ်ပါတယ်။ Probability ကတော့ ရွေးချယ်စရာတစ်ခုချင်းစီကို model က ဘယ်လောက်အလေးပေးထားလဲဆိုတဲ့ ကိန်းဂဏန်းပါ။ မေးခွန်းအမျိုးအစားအချို့မှာ confidence လည်း ပါလာနိုင်ပါတယ်။ TypeSafe က ဒီ model အုပ်စုကို System One Models လို့ နာမည်ပေးထားပါတယ်။
Public source တွေက အတည်ပြုထားတာက ဒီလောက်ပါပဲ —
- TypeSafe က model architecture အသစ်၊ မေးခွန်းတွေကို တစ်ပြိုင်နက်အဖြေရှာပေးတဲ့ parallel sampler နဲ့ probability ပိုယုံကြည်ရအောင် လေ့ကျင့်တဲ့ Reinforcement Learning for Calibrated Decisions (RLCD) ကို သုံးတယ်လို့ ဆိုထားပါတယ်။
- မေးခွန်းတစ်ခုချင်းစီကို တူညီတဲ့ state ပေါ်မှာ သီးခြားစီ၊ တစ်ပြိုင်နက် စစ်ပါတယ်။
- Output က လွတ်လပ်စွာရေးထားတဲ့စာ မဟုတ်ဘဲ ကြိုသတ်မှတ်ထားတဲ့အဖြေနဲ့ probability ဖြစ်ပါတယ်။
ဒီနေရာမှာ သတိထားရမယ့်အချက်ရှိပါတယ်။ Model အတွင်းပိုင်းဖွဲ့စည်းပုံ၊ model အရွယ်အစား၊ လေ့ကျင့်ရာမှာသုံးထားတဲ့ data နဲ့ RLCD လုပ်ပုံအပြည့်အစုံကို public မထုတ်ထားသေးပါဘူး။ ဒါကြောင့် Jev ကို BERT architecture လို့လည်း၊ စာရေးတဲ့ LLM အသေးစားတစ်ခုလို့လည်း အတည်ပြုပြောလို့ မရသေးပါဘူး။ သူဘယ်လိုအဖြေပြန်ပေးတယ်ဆိုတာ ရှင်းပြနိုင်ပေမယ့် အတွင်းမှာ ဘာ model family သုံးထားတယ်ဆိုတာ မခန့်မှန်းသင့်ပါဘူး။
LLM နဲ့ BERT ကို ဘာကြောင့် Jev နဲ့ နှိုင်းယှဉ်ရတာလဲ
Jev ကို “AI model အသစ်တစ်ခု” လို့ပဲပြောရင် သူ့နေရာက မရှင်းပါဘူး။ Support ticket ကို Billing team ဆီပို့ဖို့ model ရွေးတဲ့အခါ developer ဆီမှာ ရွေးချယ်စရာအနည်းဆုံး သုံးမျိုးရှိပါတယ်။ LLM သုံးနိုင်တယ်။ Ticket classification အတွက် BERT ကို သီးသန့်လေ့ကျင့်နိုင်တယ်။ ဒါမှမဟုတ် Jev လို decision model ကို စမ်းနိုင်တယ်။ ဒီသုံးမျိုးက အလုပ်လုပ်ပုံမတူလို့ ကိုယ်လိုတဲ့အလုပ်နဲ့ ကိုက်မကိုက် ခွဲကြည့်ရပါတယ်။
LLM ဆိုတာ ဘာလဲ
Large Language Model (LLM) ဆိုတာ ChatGPT, Claude, Gemini လို စာကိုနားလည်ပြီး စာပြန်ရေးပေးနိုင်တဲ့ model ပါ။ နည်းပညာအရ သူက နောက်လာမယ့် token ကို တစ်ခုချင်းခန့်မှန်းပြီး အဖြေတည်ဆောက်ပါတယ်။ User ကို ရှင်းပြတာ၊ အချက်အလက်တွေ ဆက်စပ်ပေးတာ၊ code နဲ့ JSON ရေးတာလို အလုပ်အမျိုးမျိုးကို လုပ်နိုင်ပါတယ်။ တစ်မျိုးတည်းသောအလုပ်နဲ့ မကန့်သတ်ထားတာက LLM ရဲ့အားသာချက်ပါ။
ဒါပေမယ့် ticket ကို ဘယ် team ပို့မလဲဆိုတာတစ်ခုပဲ သိချင်ရင် ဒီစွမ်းအားအားလုံး မလိုပါဘူး။ {"department":"billing"} လို့ပဲ ပြန်ခိုင်းထားရင်တောင် model က စာတည်ဆောက်ရပါတယ်။ Application က အဲဒီ JSON ပုံစံမှန်မမှန် စစ်ရပါတယ်။ ပုံစံပျက်ရင် ပြန်ပြင်တာ သို့မဟုတ် model ကို ပြန်ခေါ်တာ လုပ်ရပါတယ်။
ဒါကြောင့် ဒီဆောင်းပါးမှာ LLM ကို နှိုင်းယှဉ်တာပါ။ Jev က LLM ကို အစားထိုးမှာမဟုတ်ပါဘူး။ Customer ကို စာပြန်ဖို့၊ အချက်အလက်အများကြီးပေါင်းပြီး ရှင်းပြဖို့၊ အဆင့်ဆင့်စဉ်းစားဖို့ LLM ကိုသုံးမယ်။ “ဘယ် route?”, “Approve လား?”, “ဘယ် tool?” ဆိုတဲ့ ကန့်သတ်ဆုံးဖြတ်ချက်တွေကိုတော့ သီးခြား decision layer ဆီခွဲနိုင်ပါတယ်။
BERT classifier ဆိုတာ ဘာလဲ
BERT က Google Research က 2018 မှာ မိတ်ဆက်ခဲ့တဲ့ စာနားလည်မှုအတွက် တည်ဆောက်ထားသော Transformer model တစ်မျိုးပါ။ LLM လို နောက်စာကို ဆက်ရေးဖို့မဟုတ်ဘဲ စာတစ်ကြောင်းလုံးရဲ့ အရှေ့နဲ့အနောက်အဓိပ္ပာယ်ကို ကြည့်ပြီး နားလည်နိုင်အောင် ဒီဇိုင်းလုပ်ထားပါတယ်။ နည်းပညာအရ ဒီပုံစံကို encoder-only Transformer လို့ ခေါ်ပါတယ်။
BERT ကို သတ်မှတ်ထားတဲ့အုပ်စုတွေခွဲဖို့ လေ့ကျင့်နိုင်ပါတယ်။ ဒီလိုအုပ်စုခွဲပေးတဲ့ model ကို classifier လို့ခေါ်ပါတယ်။ သူရွေးရမယ့်အုပ်စုနာမည်တွေကို labels လို့ခေါ်ပါတယ်။
ဥပမာ email တစ်စောင်ကို spam / not-spam၊ review တစ်ခုကို positive / negative၊ support ticket ကို billing / technical / sales လို့ခွဲနိုင်ပါတယ်။ ရွေးချယ်စရာတွေ မကြာခဏမပြောင်းဘဲ အဖြေမှန်နမူနာ data လုံလုံလောက်လောက်ရှိရင် BERT classifier ကို အဲဒီအလုပ်တစ်ခုအတွက် လေ့ကျင့်နိုင်ပါတယ်။ ပြီးရင် ကိုယ့် server ပေါ်မှာ သေးသေးနဲ့ မြန်မြန် run လို့ရနိုင်ပါတယ်။
BERT ကို ဒီနေရာမှာ ထည့်ပြောရတာက Jev နဲ့ လက်တွေ့ယှဉ်ကြည့်သင့်တဲ့ ရှိပြီးသားနည်းလမ်းဖြစ်လို့ပါ။ Support team အုပ်စုတွေ မပြောင်းဘူး၊ အဖြေမှန်နမူနာတွေရှိတယ်၊ model ကို ပြန်လေ့ကျင့်နိုင်တဲ့အဖွဲ့ရှိတယ်ဆိုရင် BERT classifier သေးသေးတစ်လုံးက ပိုရိုးရှင်းနိုင်ပါတယ်။ ဒီနည်းလမ်းကိုမစမ်းဘဲ Jev က ပိုမြန်တယ်၊ ပိုကောင်းတယ်လို့ မဆိုသင့်ပါဘူး။
အဲဒီနောက် Jev ရဲ့ ကွာခြားချက်
Jev က LLM လို စာပြန်ရေးပေးတာမဟုတ်ပါဘူး။ ရွေးချယ်စရာတစ်စုတည်းအတွက် ကြိုတင်လေ့ကျင့်ထားတဲ့ BERT classifier နဲ့လည်း interface မတူပါဘူး။ Public description အရ လက်ရှိ state နဲ့ developer ရေးထားတဲ့မေးခွန်းတွေကိုယူပြီး သတ်မှတ်ထားတဲ့ရွေးချယ်မှုထဲက အဖြေ၊ probability နဲ့ confidence ကို ပြန်ပေးပါတယ်။
ကွာခြားချက်ကို မေးခွန်းပုံစံနဲ့ကြည့်ရင် ရှင်းပါတယ်။ BERT classifier က “ဒီစာက ဘယ် category လဲ” ကို ဖြေတတ်ပါတယ်။ Jev ရဲ့ interface ကတော့ “ဒီ state ကိုကြည့်ပြီး software က ဘာလုပ်သင့်လဲ” ကို ဖြေဖို့ ရည်ရွယ်ထားပါတယ်။
| အချက် | Autoregressive LLM | BERT-family classifier | Jev / System One model |
|---|---|---|---|
| အဓိက output | Generated text သို့မဟုတ် generated JSON | Fixed label logits | Typed value + probability |
| Label space | Prompt ထဲမှာညှိနိုင်ပေမယ့် text generation လို | များသောအားဖြင့် training-time fixed | Question/criteria ဖြင့် runtime မှာသတ်မှတ် |
| အားသာချက် | Explanation, synthesis, multi-step reasoning | Stable task အတွက် small, fast specialist | Parallel bounded decisions, software-ready interface |
| သတိထားရန် | Parse failure, extra tokens, prompt drift | New label/task အတွက် retraining လိုနိုင် | Closed architecture, calibration နှင့် semantic error ကို local eval လုပ်ရမည် |
အတိုချုပ်ရရင် LLM က စာရေး၊ ဆက်စပ်စဉ်းစားပြီး ရှင်းပြတဲ့ generalist ပါ။ BERT classifier က label set တည်ငြိမ်တဲ့ task တစ်ခုအတွက် specialist ပါ။ Jev ကတော့ software flow ထဲက typed decisions တွေအတွက် decision engine ဖြစ်ဖို့ ရည်ရွယ်ထားပါတယ်။ သုံးခုလုံးမှာ သူ့နေရာနဲ့သူရှိပါတယ်။
Jev က အလုပ်လုပ်ပုံကို အဆင့်လေးဆင့်နဲ့ကြည့်မယ်
Support ticket ဥပမာကိုပဲ ဆက်ကြည့်ရအောင်။ Jev က အဖြေထုတ်ပုံကို အပိုင်းလေးပိုင်းခွဲလိုက်ရင် နားလည်ရလွယ်ပါတယ်။
- State — လက်ရှိအခြေအနေ။ Customer ရေးလာတဲ့စာ၊ account အခြေအနေနဲ့ payment record တို့ပါ။ ဆုံးဖြတ်ချက်ချဖို့ model သိထားရမယ့် အချက်အလက်လို့ နားလည်လို့ရပါတယ်။
- Typed questions — အဖြေပုံစံသတ်မှတ်ထားတဲ့မေးခွန်း။ “ဘယ် department?”, “urgent ဟုတ်လား?”, “လူကစစ်ဖို့လိုသလား?” ဆိုပြီး မေးပါတယ်။ အဖြေကိုလည်း choice, true/false သို့မဟုတ် score လို ပုံစံသတ်မှတ်ထားပါတယ်။
- Parallel evaluation — တစ်ပြိုင်နက်စစ်ခြင်း။ မေးခွန်းတစ်ခုချင်းစီကို တူညီတဲ့ state ပေါ်မှာ သီးခြားစစ်ပါတယ်။ ပထမမေးခွန်းဖြေပြီးမှ ဒုတိယမေးခွန်းကို စောင့်ဖြေစရာမလိုပါဘူး။
- Probability နဲ့ confidence — အဖြေကို ဘယ်လောက်ယုံရမလဲကြည့်ခြင်း။ Code က
Billingဆိုတဲ့အဖြေတစ်ခုတည်းမကြည့်ပါဘူး။ အခြားရွေးချယ်မှုတွေနဲ့ ဘယ်လောက်ကွာသလဲ၊ ဒီအလုပ်မှားရင် risk ဘယ်လောက်ရှိသလဲကိုပါကြည့်ပြီး နောက်တစ်ဆင့်ကို ရွေးပါတယ်။
Direct decision layer
Low-risk · repeatable route
- INPUTApp stateticket + account
- DECIDETyped questionsteam · urgency
- ACTAuto-routereversible action
Use when label ဘောင်တည်ငြိမ်ပြီး မှားယွင်းမှုကို ပြန်ပြင်လို့ရချိန်
Confidence-gated cascade
Mixed complexity · selective escalation
- FAST PATHDecision modelanswer + confidence
- GATEPolicy checkthreshold + rules
- ROUTEAuto / LLMsimple ↗ complex
Use when case အများစုရိုးရှင်းပေမယ့် context သို့မဟုတ် generation လိုသည့် case ရှိချိန်
Human-in-the-loop
High-risk · accountable approval
- ASSESSRisk signaldecision + evidence
- HOLDReview queueno automatic final act
- APPROVEHuman owneraudit trail
Use when legal, financial သို့မဟုတ် safety consequence ကြီးပြီး လူက final authority ဖြစ်ရမည့်အချိန်
Diagram transcript: Direct pattern က application state မှ typed decision ကိုဖြတ်ပြီး reversible action ဆီ တိုက်ရိုက်ပို့သည်။ Cascade pattern က confidence နှင့် policy gate ဖြင့် simple case ကို auto-route လုပ်ပြီး complex case ကို LLM ဆီတင်သည်။ High-risk pattern က evidence ပါသော risk signal ကို review queue ထဲထားပြီး လူကသာ final action ကိုအတည်ပြုသည်။
Scope note: ဤပုံသည် deployment options ကိုရှင်းပြရန်ရေးဆွဲထားသော conceptual system design ဖြစ်ပြီး TypeSafe ၏ internal architecture diagram မဟုတ်သလို benchmark evidence လည်း မဟုတ်ပါ။
Official documentation က မေးခွန်းတစ်ခုမှာ အချက်တစ်ခုပဲ မေးဖို့ အကြံပြုထားပါတယ်။ “ဒီ startup ကို invest လုပ်သင့်လား” လို့ အားလုံးရောမမေးဘဲ ဈေးကွက်ကြီးမားမှု၊ တကယ်တည်ဆောက်နိုင်မှုနဲ့ ပြိုင်ဘက်ထက်ကွာခြားမှုကို သီးခြားမေးတာမျိုးပါ။ ပြီးမှ application code က ကိုယ့်စည်းမျဉ်းအတိုင်း အဖြေတွေကို ပေါင်းစပ်ပါတယ်။ အဓိကက သုံးသပ်တာကို model ဆီထားပြီး စည်းမျဉ်းကို code ဆီထားဖို့ ပါ။
Noul, Choice, Score ဆိုတာဘာလဲ
TypeSafe API မှာ မေးခွန်းပုံစံသုံးမျိုးရှိပါတယ်။ အမည်က နည်းနည်းအသစ်ဖြစ်လို့ တစ်ခုချင်းကြည့်ပါမယ်။
- Noul — ဟုတ်/မဟုတ်ကို ဖြစ်နိုင်ခြေနဲ့ဖြေခြင်း။
0ကနေ1အထိ ပြန်ပေးပါတယ်။ ဥပမာ “ဒီ message က အရေးကြီးကြောင်းပြသလား?” လို့ မေးနိုင်ပါတယ်။ - Choice — ရွေးချယ်စရာထဲကတစ်ခုရွေးခြင်း။
Billing / Technical / Salesထဲက တစ်ခုကိုရွေးပြီး တစ်ခုချင်းစီရဲ့ probability နဲ့ confidence ကို ပြန်ပေးပါတယ်။ - Score — သတ်မှတ်ထားတဲ့အဆင့်နဲ့တိုင်းခြင်း။ Customer စိတ်မကျေနပ်မှုကို
Low / Medium / Highလို အဆင့်တွေနဲ့တိုင်းပြီး အဆင့်တစ်ခုချင်းစီရဲ့ probability နဲ့ confidence ကို ပြန်ပေးပါတယ်။
ဒီနေရာမှာ probability နဲ့ confidence ကို မရောသင့်ပါဘူး။ Probability က အဖြေတစ်ခုဖြစ်နိုင်ခြေကို ပြပါတယ်။ Confidence ကတော့ probability တွေ ဘယ်လောက်ပြတ်သားစွာခွဲထွက်နေသလဲကို ချုံ့ပြတဲ့အချက်ပါ။ Noul မှာ သီးခြား confidence field မပါဘူးဆိုတာ confidence docs မှာ ရှင်းထားပါတယ်။ သူပြန်ပေးတဲ့ 0-1 value က စာကြောင်းမှန်နိုင်ခြေကိုယ်တိုင်ပါ။ Choice နဲ့ Score မှာတော့ probability တွေ ဘယ်လောက်စုသလဲ၊ ပြန့်သလဲဆိုတာကနေ confidence ကို ထပ်တွက်ပေးထားပါတယ်။
Quickstart request ကို အလွယ်ချုံ့ကြည့်ရင် shape က ဒီလိုပါ —
{
  "state": "My card was charged twice and I cannot cancel.",
  "model": "jev-latest",
  "questions": {
    "department": {
      "type": "choice",
      "instructions": "Which team should handle this?",
      "criteria": {
        "billing": "Payment or subscription issues",
        "technical": "Bugs or integration problems",
        "sales": "Pricing or account questions"
      }
    },
    "is_urgent": {
      "type": "noul",
      "instructions": "The message requires urgent attention"
    }
  }
}
Response ပြန်လာရင် application က စာပိုဒ်ထဲကအဖြေကို လိုက်ရှာစရာမလိုပါဘူး။ answers.department.choice, answers.department.probabilities, answers.department.confidence နဲ့ answers.is_urgent.noul ကို တိုက်ရိုက်ဖတ်နိုင်ပါတယ်။
ဒါပေမယ့် schema မှန်တာနဲ့ အဓိပ္ပာယ်မှန်တာ မတူပါဘူး။ Allowed label ပဲပြန်လာတာက type safety ပါ။ Ticket ကို department မှားရွေးတာ၊ policy ကို မှားနားလည်တာကတော့ ဖြစ်နိုင်သေးပါတယ်။ ဒါကြောင့် “Zero hallucination” ဆိုတဲ့စကားကို အဖြေအားလုံး မှန်မယ်လို့ မယူသင့်ပါဘူး။ သူက schema အပြင်ကို စိတ်ကြိုက်စာမရေးဘူးဆိုတဲ့ဘက်ကို အဓိကဆိုလိုတာပါ။
Speed နဲ့ cost က ဘာကြောင့်ပြောင်းသလဲ
LLM cost ကိုစဉ်းစားရင် input tokens ပဲမကြည့်သင့်ပါဘူး။ Output tokens ကို တစ်လုံးပြီးတစ်လုံး ဆက်ထုတ်ရတာလည်း အချိန်နဲ့ငွေကုန်ပါတယ်။ Output ရှည်လေလေ decoding steps များလေလေပါ။
Decision-only အလုပ်မှာ စာတစ်ကြောင်းတောင် မလိုပါဘူး။ Billing 0.94 လောက်ပဲလိုတဲ့အလုပ်အတွက် paragraph တစ်ပိုဒ် generate လုပ်ပြီး ပြန် parse လုပ်နေရင် မလိုတဲ့အလုပ် နှစ်ခါလုပ်နေသလို ဖြစ်ပါတယ်။ ဒီ generation အဆင့်ကိုဖယ်နိုင်ရင် speed နဲ့ cost သက်သာနိုင်တာက Jev ရဲ့ အဓိကအဆိုပါ။
TypeSafe ၏ public numbers အရ Jev က —
- end-to-end response time 70-500 ms၊
- input price $0.042 per million tokens၊
- output ကို “too cheap to meter” လို့ သတ်မှတ်ထားပါတယ်။
ဒီကိန်းဂဏန်းတွေကို ဘယ်လိုဖတ်ရမလဲက ပိုအရေးကြီးပါတယ်။ ဒါတွေက company ကိုယ်တိုင် report လုပ်ထားတဲ့ service numbers ပါ။ ကိုယ့် region, payload size, concurrency, network နဲ့ workload မှာ အတူတူရမယ်လို့ မဆိုနိုင်ပါဘူး။ Homepage က 193.6x faster / 444.6x cheaper ဆိုတာလည်း TypeSafe ၏ workflow evals က company benchmark headline ဖြစ်ပြီး model အားလုံးအတွက် သတ်မှတ်ထားတဲ့ ratio မဟုတ်ပါဘူး။ Announcement ထဲမှာတောင် ဒီ gains တွေက real-world range ရဲ့ high end ဖြစ်နိုင်ပြီး workflow authors ကြောင့် bias ရှိနိုင်တယ်လို့ caveat ပေးထားပါတယ်။
ဒါကြောင့် token price တစ်ခုတည်းနဲ့ မဆုံးဖြတ်ပါနဲ့။ လက်ခံနိုင်တဲ့ decision တစ်ခုရဖို့ ဘယ်လောက်ကုန်လဲ, p95 latency ဘယ်လောက်လဲ၊ case ဘယ်နှခု escalation တက်လဲ၊ မှားသွားရင် ဘယ်လောက်ဆုံးရှုံးလဲဆိုတာ အတူတိုင်းရပါတယ်။ Jev call က စျေးသက်သာပေမယ့် case အများစုကို နောက်ဆုံးမှာ expensive LLM ဆီပဲ ပို့နေရရင် system တစ်ခုလုံးရဲ့ cost က မသက်သာနိုင်ပါဘူး။
လက်တွေ့သုံးလို့ကောင်းတဲ့နေရာများ
ဘယ်လိုအခြေအနေမှာ ဘာဆုံးဖြတ်မလဲ
Customer support routing
- ကြည့်မည့်အရာ
- Ticket + account state
- ရွေးမည့်အရာ
- Team · priority · refund intent
- လုံခြုံရေးစည်း
- Confidence + urgency rule
Customer-facing စာကိုမရေးခိုင်းဘဲ routing ကိုသာ အရင်ဆုံးခွဲပါတယ်။
Agent tool selection
- ကြည့်မည့်အရာ
- User request + available tools
- ရွေးမည့်အရာ
- Search · API · clarification
- လုံခြုံရေးစည်း
- Evidence + permission check
Tool argument နဲ့ evidence synthesis ကို LLM ဆီထားပြီး repeated branch ကို decision model ဆီရွှေ့ပါတယ်။
Review / compliance triage
- ကြည့်မည့်အရာ
- Document + policy facts
- ရွေးမည့်အရာ
- Relevance · risk · priority
- လုံခြုံရေးစည်း
- Policy + consequence
Legal သို့မဟုတ် fraud လို high-consequence case ကို model တစ်ခုတည်းနဲ့ final မလုပ်ပါဘူး။
Batch data enrichment
- ကြည့်မည့်အရာ
- Record အများအပြား
- ရွေးမည့်အရာ
- Category · quality · risk
- လုံခြုံရေးစည်း
- Rare class + drift check
Throughput တစ်ခုတည်းမဟုတ်ဘဲ rare-class recall နဲ့ drift ကိုပါ စောင့်ကြည့်ရပါတယ်။
TypeSafe patterns က intent routing, confidence-gated routing, speculative fan-out နဲ့ composite scoring ကို ဒီလို composition အတွက် ဖော်ပြထားပါတယ်။
ဒီ use cases တွေရဲ့ တူညီတဲ့အချက်က output space ကို ကြိုသတ်မှတ်လို့ရတာပါ။ Customer ကို ဘာပြောမလဲဆိုတာ open-ended ဖြစ်ပေမယ့် ticket ကို ဘယ် queue ပို့မလဲဆိုတာက bounded ဖြစ်ပါတယ်။ Jev-style model သုံးဖို့ သင့်မသင့်ကို ဒီမေးခွန်းနဲ့ အရင်ခွဲလို့ရပါတယ်။
Probability က ယုံကြည်စိတ်ချရမှု မဟုတ်သေးဘူး
Choice တစ်ခုမှာ Billing 0.95 ထွက်တယ်ဆိုပါစို့။ အဓိပ္ပာယ်က model ရဲ့ distribution ထဲမှာ Billing ကို 95% probability mass ပေးထားတာပါ။ “ဒီ model က 95% accurate” လို့ မဆိုလိုပါဘူး။
Calibration ကောင်းတယ်ဆိုတာ 0.95 လို့ပြောထားတဲ့ production-like cases အများကြီးကို စုပြီးကြည့်ရင် အနီးစပ်ဆုံး 95% မှန်တာကို ဆိုလိုပါတယ်။ ကိုယ့် data နဲ့ validation မလုပ်ရသေးခင် probability number ကို accuracy လို့ တိုက်ရိုက်မပြောင်းသင့်ပါဘူး။
Confidence threshold တစ်ခုတည်းကို system အားလုံးမှာ မသုံးသင့်ပါဘူး။ Password-reset ticket မှား route သွားတာကို ပြန်ပြင်လို့ရပါတယ်။ Bank transfer မှား approve ဖြစ်တာကတော့ ဆုံးရှုံးမှုကြီးနိုင်ပါတယ်။ Confidence တူရင်တောင် action risk မတူပါဘူး။ ဒါကြောင့် risk အလိုက် gate ခွဲရပါတယ် —
Threshold ကို documentation ထဲက generic number တစ်ခုကနေ မကူးသင့်ပါဘူး။ ကိုယ့် false positive နဲ့ false negative က ဘယ်လောက်ကုန်မလဲ၊ validation data မှာ result ဘယ်လိုထွက်လဲဆိုတာကနေ ရွေးရပါတယ်။ Burmese-English ရောထားတဲ့စာ၊ domain အသစ်၊ policy ပြောင်းတာနဲ့ state မပြည့်စုံတာတွေကြောင့် confidence မြင့်ပြီး မှားတဲ့အဖြေ ထွက်နိုင်ပါတယ်။
အကောင်းဆုံး production pattern — confidence-gated cascade
လက်တွေ့မှာ Jev ကို သီးခြားထားပြီး traffic အားလုံးပို့တာထက် LLM ရှေ့က decision layer အဖြစ်ထားတာ ပိုအသုံးဝင်ပါတယ်။ ဒီပုံစံကို cascade လို့ခေါ်ပါတယ်။
- Fast decision model က intent, risk နဲ့ next action ကို သတ်မှတ်တယ်။
- Code က confidence, business rule နဲ့ action reversibility ကို gate လုပ်တယ်။
- ရှင်းပြီး risk နည်းတဲ့ case ကို တိုက်ရိုက် execute လုပ်တယ်။
- မရှင်းတဲ့ case ကို retrieval + reasoning LLM ဆီပို့တယ်။
- Policy သတ်မှတ်ထားရင် human reviewer က final approval ပေးတယ်။
ဥပမာ Billing 0.97, Technical 0.02, Sales 0.01 ထွက်ပြီး ဒီ routing က risk နည်းတယ်ဆိုရင် Billing queue ဆီ တိုက်ရိုက်ပို့နိုင်ပါတယ်။ Billing 0.51, Technical 0.46 ဖြစ်နေရင် မသေချာပါဘူး။ အဲဒီ case ကို LLM သို့မဟုတ် human reviewer ဆီတင်သင့်ပါတယ်။
ဒီ cascade ရဲ့အကျိုးက powerful LLM ကို မဖယ်ဘဲ သူတကယ်လိုတဲ့နေရာမှာပဲ သုံးနိုင်တာပါ။ ရိုးရှင်းတဲ့ decision တွေကို မြန်မြန်စစ်ထုတ်ပြီး ခက်တဲ့ case တွေအတွက် latency နဲ့ budget ချန်ထားနိုင်ပါတယ်။ Traffic အားလုံးကို Jev တစ်ခုတည်းနဲ့ ဖြေရှင်းမယ်ဆိုတာထက် ဒီပုံစံက ပိုလက်တွေ့ကျပါတယ်။
ဒီ pattern ကို Jev အကြောင်းရေးထားတဲ့ တခြား source တွေကလည်း မတူတဲ့ဘက်ကနေ ပြထားပါတယ်။ DataCamp ရဲ့ explainer က bounded output ရှိတဲ့ high-volume decision အတွက် Jev၊ explanation နဲ့ open-ended reasoning အတွက် LLM ဆိုပြီး အလုပ်ခွဲကြည့်ထားပါတယ်။ ပိုတိကျတဲ့ evidence အနေနဲ့ REFLEX paper က task 100 ပါ frozen benchmark တစ်ခုမှာ low-confidence သို့မဟုတ် generation လိုတဲ့ case ကို strong LLM ဆီပို့တဲ့ cascade ကို စမ်းထားပါတယ်။ Report လုပ်ထားတဲ့ strong-model call လျော့မှုက စိတ်ဝင်စားဖို့ကောင်းပေမယ့် cheap generative router က အစကတည်းကတိကျနေတဲ့ evaluation တွေမှာ Jev ရဲ့အားသာချက်က နည်းသွားတယ်လို့လည်း paper က ရှင်းထားပါတယ်။ ဒါကြောင့် “decision model တစ်လုံးထည့်လိုက်ရင် အမြဲပိုကောင်းမယ်” ဆိုတဲ့ conclusion မထုတ်သင့်ပါဘူး။
Pokémon Red case study ကို Tom’s Hardware က ဖော်ပြထားတာ ကလည်း ဒီအလုပ်ခွဲပုံကို မြင်သာစေပါတယ်။ Jev က legal actions စာရင်းထဲက move ကိုရွေးခဲ့ပေမယ့် screen ကိုကိုယ်တိုင်မဖတ်သလို open-ended strategy လည်း မရေးခဲ့ပါဘူး။ Claude Opus 5 က game log ကိုစောင့်ကြည့်ပြီး options နဲ့ wording ကိုပြင်ပေးခဲ့သလို developer နဲ့ audience ရဲ့ intervention လည်း ရှိခဲ့ပါတယ်။ ဒီရလဒ်ကို autonomous Jev တစ်လုံးတည်းရဲ့အောင်မြင်မှုလို့မယူဘဲ bounded decision model + LLM coach + engineered harness ပေါင်းစပ်ထားတဲ့ system result လို့ဖတ်တာ ပိုမှန်ပါတယ်။
ဘယ်အချိန်မှာ Jev မသုံးသင့်လဲ
အောက်ပါအလုပ်တွေမှာ Jev တစ်ခုတည်း မလုံလောက်ပါဘူး —
- User-facing explanation, email, report သို့မဟုတ် code ကို ရေးပေးရမယ်။
- Contract, incident history, law နဲ့ policy အများကြီးကို ရှာဖွေပြီး multi-hop reasoning လုပ်ရမယ်။
- Output space ကို ကြိုတင်မသတ်မှတ်နိုင်သေးဘူး၊ discovery လုပ်နေတုန်းပဲ။
- Labels တည်ငြိမ်ပြီး labeled data ကောင်းကောင်းရှိလို့ သေးငယ်တဲ့ local BERT classifier တစ်လုံးနဲ့ လုံလောက်တယ်။
- Data residency, offline deployment သို့မဟုတ် model-weight audit လိုအပ်ပေမယ့် closed hosted service ကို မသုံးနိုင်ဘူး။
- Error တစ်ခုရဲ့ consequence အလွန်မြင့်ပြီး deterministic verification သို့မဟုတ် human sign-off မရှိဘူး။
အစပိုင်းမှာ label ကိုယ်တိုင် မသေချာသေးရင် few-shot LLM classification နဲ့ မြန်မြန်စမ်းတာ ပိုကောင်းနိုင်ပါတယ်။ Task တည်ငြိမ်လာပြီး traffic များလာတာ၊ latency မြင့်လာတာ၊ JSON reliability ပြဿနာပေါ်လာတာနဲ့မှ dedicated decision model ကို ယှဉ်စမ်းပါ။ Tool တစ်ခုရှိလို့ task ကို အတင်းလိုက်ညှိတာထက် task တည်ငြိမ်ပြီးမှ tool ရွေးတာက ပိုမှန်ပါတယ်။
Open alternatives ကို ဘယ်လိုကြည့်မလဲ
Jev ရဲ့ idea ကိုစမ်းချင်ရင် closed service တစ်ခုတည်းနဲ့ မကန့်သတ်ထားပါဘူး။ နည်းလမ်းမတူတဲ့ open projects တွေလည်း ရှိပါတယ် —
- SemIf — generative answer ကိုရှည်ရှည်မထုတ်ဘဲ option scoring ဆန်တဲ့ interface ကို လေ့လာဖို့ကောင်းပါတယ်။
- Bespoke Nimble — decision tasks အတွက် fine-tuned model direction ကို စမ်းသပ်ထားပါတယ်။
- Mapika Decider — typed routing/decision family ကို open implementation ဘက်က လေ့လာနိုင်ပါတယ်။
- Laya — ModernBERT-based non-autoregressive decision approach ကို ပြထားပါတယ်။
ဒါပေမယ့် ဒီ projects တွေကို “Jev clone” လို့ တန်းမခေါ်သင့်ပါဘူး။ သုံးထားတဲ့ base model, training recipe, calibration, license နဲ့ API behavior မတူနိုင်ပါတယ်။ JevBench ကလည်း Jev-class models တွေကို နှိုင်းယှဉ်ဖို့ community benchmark တစ်ခုပါ။ Peer-reviewed universal verdict မဟုတ်ပါဘူး။ Result မကြည့်ခင် dataset ထဲမှာ ဘာတွေပါလဲ၊ prompt/template ဘာသုံးလဲ၊ hardware နဲ့ provider latency ဘယ်လိုတိုင်းလဲ၊ model version ကို pin လုပ်ထားလားဆိုတာ အရင်ဖတ်သင့်ပါတယ်။
ကျွန်တော်ဆိုရင် ဒီ checklist နဲ့စမ်းမယ်
ကျွန်တော်ဆိုရင် demo ထဲက speed number ကိုကြည့်ပြီး model မရွေးပါဘူး။ ကိုယ့်အလုပ်နဲ့တူတဲ့ evaluation set တစ်ခုလုပ်ပြီး အောက်ကအတိုင်း စမ်းပါမယ်။
- Decision တစ်မျိုးပဲရွေးပါ။ Ticket routing သို့မဟုတ် tool selection လို အဖြေကန့်သတ်ထားတဲ့ task တစ်ခုနဲ့စပါ။
- မရွေးနိုင်တဲ့လမ်းကိုပါ ထည့်ပါ။ “none of the above”, “need more context”, “human review” မရှိရင် model ကို မသိတာတောင် အတင်းရွေးခိုင်းထားသလို ဖြစ်ပါတယ်။
- ကိုယ့် production နဲ့တူတဲ့ data ပြင်ပါ။ လွယ်တဲ့ example တွေသာမက rare classes, Burmese-English mixed text, typo, missing context နဲ့ adversarial input ပါထည့်ပါ။
- Baseline တွေနဲ့ data တူတူပေါ်မှာယှဉ်ပါ။ Few-shot LLM, BERT/ModernBERT classifier, open decision model နဲ့ Jev ကို တူညီတဲ့ test set ပေါ်မှာစမ်းပါ။
- Accuracy တစ်ခုတည်းမကြည့်ပါနဲ့။ Class တစ်ခုချင်းစီရဲ့ precision/recall, calibration error, confidence မြင့်ပြီးမှားတဲ့နှုန်းနဲ့ escalation rate ကိုတိုင်းပါ။
- System တစ်ခုလုံးကိုတိုင်းပါ။ p50/p95 latency, concurrent requests အောက်က throughput, network failures, request 1,000 အတွက် cost နဲ့ လက်ခံနိုင်တဲ့ decision တစ်ခုအတွက် cost ကိုကြည့်ပါ။
- Risk အလိုက် threshold ခွဲပါ။ Auto-tagging, auto-routing နဲ့ auto-payment ကို confidence gate တစ်ခုတည်း မသုံးပါနဲ့။
- Shadow mode နဲ့စပါ။ Model က decision ပေးပေမယ့် action မလုပ်သေးဘဲ လက်ရှိ system ရဲ့ outcome နဲ့ နှိုင်းယှဉ်ပါ။
- Data ပြောင်းတာကို စောင့်ကြည့်ပါ။ Label အချိုး၊ language mix၊ product/policy အသစ်နဲ့ confidence distribution ပြောင်းရင် သိနိုင်အောင် alert ထားပါ။
- Fallback ကို system ရဲ့အစိတ်အပိုင်းလို့ သဘောထားပါ။ Low-confidence case ကို လူဆီတင်တာက model ပျက်တာမဟုတ်ပါဘူး။ System က မသေချာမှုကို မှန်မှန် handle လုပ်တာ ဖြစ်နိုင်ပါတယ်။
နောက်ဆုံး takeaway
Jev ရဲ့ စိတ်ဝင်စားစရာအကောင်းဆုံးအချက်က “LLM ထက်ပိုကောင်းတဲ့ AI” ဆိုတာမဟုတ်ပါဘူး။ စာရေးတတ်တဲ့ model ကို ဆုံးဖြတ်ချက်တိုင်းအတွက် သုံးစရာမလိုဘူး ဆိုတဲ့ lesson ပါ။ Software ကလိုတာ bounded choice တစ်ခုပဲဆိုရင် typed probabilities, parallel evaluation နဲ့ confidence gate က စာ generate လုပ်တာထက် ပိုတည့်နိုင်ပါတယ်။
ဒါပေမယ့် typed output ဖြစ်တာနဲ့ အဖြေမှန်သွားတာမဟုတ်ပါဘူး။ Company benchmark ကလည်း ကိုယ့် workload ရဲ့ benchmark မဟုတ်ပါဘူး။ Jev ကိုစမ်းမယ်ဆိုရင် speed headline ကိုပဲ မကြည့်ပါနဲ့။ Confidence မြင့်ပြီးမှားတာ ဘယ်နှခုရှိလဲ၊ fallback ခေါ်ပြီးနောက် တကယ်ဘယ်လောက်ကုန်လဲ၊ မှားတဲ့ decision တစ်ခုက business ကို ဘယ်လောက်ထိလဲ ဆိုတာကို စမ်းပါ။
လက်တွေ့တည်ဆောက်မယ့်သူအတွက်တော့ အဖြေက ရိုးပါတယ် — မြန်တဲ့ model က လမ်းခွဲရွေးမယ်၊ code က policy ကိုထိန်းမယ်၊ LLM က ခက်တာကို စဉ်းစားရှင်းပြမယ်၊ လူက risk မြင့်တာကို အတည်ပြုမယ်။ Jev က ဒီအလုပ်ခွဲပုံကို ပိုရှင်းအောင် ပြနေပါတယ်။
ဆက်ဖတ်ရန်နှင့် အရင်းအမြစ်များ
- TypeSafe AI — Introducing System One Models & Jev
- DataCamp — Jev: TypeSafe’s System One Model Explained
- REFLEX with Jev for Efficient Selective Control in LLM Agents
- Tom’s Hardware — Jev Plays Pokémon Red case study
- TypeSafe documentation — Introduction
- TypeSafe documentation — Quickstart
- TypeSafe documentation — Confidence
- TypeSafe documentation — Patterns
- TypeSafe workflow evals
- TypeSafe AI team
- BERT paper
- InstructGPT paper
- JevBench repository